I finally got around to finishing my never ending curtain project. It all started with these boring curtains, as seen below. Cocoa tries to help out as much as she can...
My original plan was to dip dye them with an ombre effect, tape them off with a chevron pattern, and lastly spray paint. Wrong... keep reading.
I tied them up to divide the sections for the ombre effect. I had looked up online on how to do this. Confession: I'm very impatient with my D.I.Y projects and sometimes it works out and other times it doesn't. I thought the sink would be good enough place to dye the panels. Wrong, again. This is a very thick canvas fabric (meaning, it doesn't want to absorb a lot of color) and with little space in my tiny sink it makes it even harder for the fabric to get fully saturated.
I started with the first section and let it absorb for about an hour, then I would put the next section in.... At the end, the entire curtain was submerged in the dye. I just went off the directions on the amount of time to let it sit in the dye.
Did I mention to wear gloves? I had smurf hands for a few days....
After all the panels were done, I ran them through a rinse cycle. No detergent because I didn't want to risk the color fading. (Side note: to ensure that the dye is completely gone from your washer, run another rinse cycle before actually washing anything. You don't want to ruin anything!)
As you can see below, it did not come out ombre. It turned out more tie dyed than anything. But I wasn't too worried since I still had the chevron step to go.
After ironing the panels, I started measuring and taping off. I really thought I could just tape it off and it would be super easy. Wrong, again. This one, uneven, row took an hour. "Ain't nobody got time for that." (If you haven't seen that YouTube video, I suggest you do.) So the taping and spray painting was out of the question... Moving onto the next.
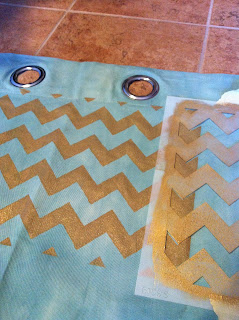
I bought this handy stencil from Royal Design Studio. Took a trip to Michael's (again) for some gold paint, Martha Stewart Stencil Roller, and paint sponges.
Row by row, section by section... it was coming together. The hardest part was getting the print to line up and the paint not to bleed.
Cocoa loves to help... again. Stella is planted in the corner. You can tell who is the boss out of the two.
After 5 hours and an aching back... I was done! I'm overall very pleased with the way they turned out, even with a few imperfections. Will I ever do this again? ABSOLUTELY not. These curtains will be making it's way into many future rooms. They took way too long to not last several years.
The used supplies. Sorry, I forgot to get a shot of the before.
Ta-Da!
What project shall I come up with next? Stay tuned...


LOVE THEM!!
ReplyDelete